您好,登錄后才能下訂單哦!
您好,登錄后才能下訂單哦!
一、Bootstrap 面板(Panels)
本章將講解 Bootstrap 面板(Panels)。面板組件用于把 DOM 組件插入到一個盒子中。創建一個基本的面板,只需要向 <div> 元素添加 class .panel 和 class .panel-default 即可,如下面的實例所示:
<div class="panel panel-default">
 <div class="panel-body">
  這是一個基本的面板
 </div>
</div>
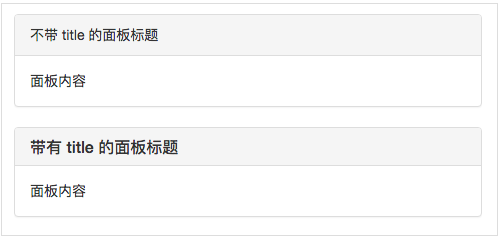
1.面板標題
我們可以通過以下兩種方式來添加面板標題:
使用 .panel-heading class 可以很簡單地向面板添加標題容器。
使用帶有 .panel-title class 的 <h2>-<h7> 來添加預定義樣式的標題。
<!DOCTYPE html>
<html>
<head>
 <meta charset="utf-8">
 <title>Bootstrap 實例 - 面板標題</title>
 <link rel="stylesheet" href="https://cdn.static.runoob.com/libs/bootstrap/3.3.7/css/bootstrap.min.css" rel="external nofollow" rel="external nofollow" rel="external nofollow" rel="external nofollow" >
 <script src="https://cdn.static.runoob.com/libs/jquery/2.1.1/jquery.min.js"></script>
 <script src="https://cdn.static.runoob.com/libs/bootstrap/3.3.7/js/bootstrap.min.js"></script>
</head>
<body>
<div class="panel panel-default">
 <div class="panel-heading">
  不帶 title 的面板標題
 </div>
 <div class="panel-body">
  面板內容
 </div>
</div>
<div class="panel panel-default">
 <div class="panel-heading">
  <h4 class="panel-title">
   帶有 title 的面板標題
  </h4>
 </div>
 <div class="panel-body">
  面板內容
 </div>
</div>
</body>
</html>

2.面板腳注
我們可以在面板中添加腳注,只需要把按鈕或者副文本放在帶有 class .panel-footer 的 <div> 中即可。下面的實例演示了這點:
實例
<div class="panel panel-default">
 <div class="panel-body">
  這是一個基本的面板
 </div>
 <div class="panel-footer">面板腳注</div>
</div>
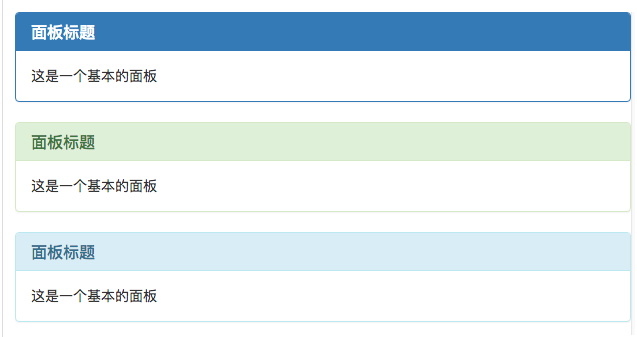
3.帶語境色彩的面板
使用語境狀態類 panel-primary、panel-success、panel-info、panel-warning、panel-danger,來設置帶語境色彩的面板,實例如下:
<!DOCTYPE html>
<html>
<head>
 <meta charset="utf-8">
 <title>Bootstrap 實例 - 帶語境色彩的面板</title>
 <link rel="stylesheet"  rel="external nofollow" rel="external nofollow" rel="external nofollow" rel="external nofollow" >
 <script src="https://cdn.static.runoob.com/libs/jquery/2.1.1/jquery.min.js"></script>
 <script src="https://cdn.static.runoob.com/libs/bootstrap/3.3.7/js/bootstrap.min.js"></script>
</head>
<body>
<div class="panel panel-primary">
 <div class="panel-heading">
  <h4 class="panel-title">面板標題</h4>
 </div>
 <div class="panel-body">
  這是一個基本的面板
 </div>
</div>
<div class="panel panel-success">
 <div class="panel-heading">
  <h4 class="panel-title">面板標題</h4>
 </div>
 <div class="panel-body">
  這是一個基本的面板
 </div>
</div>
<div class="panel panel-info">
 <div class="panel-heading">
  <h4 class="panel-title">面板標題</h4>
 </div>
 <div class="panel-body">
  這是一個基本的面板
 </div>
</div>
<div class="panel panel-warning">
 <div class="panel-heading">
  <h4 class="panel-title">面板標題</h4>
 </div>
 <div class="panel-body">
  這是一個基本的面板
 </div>
</div>
<div class="panel panel-danger">
 <div class="panel-heading">
  <h4 class="panel-title">面板標題</h4>
 </div>
 <div class="panel-body">
  這是一個基本的面板
 </div>
</div>
</body>
</html>

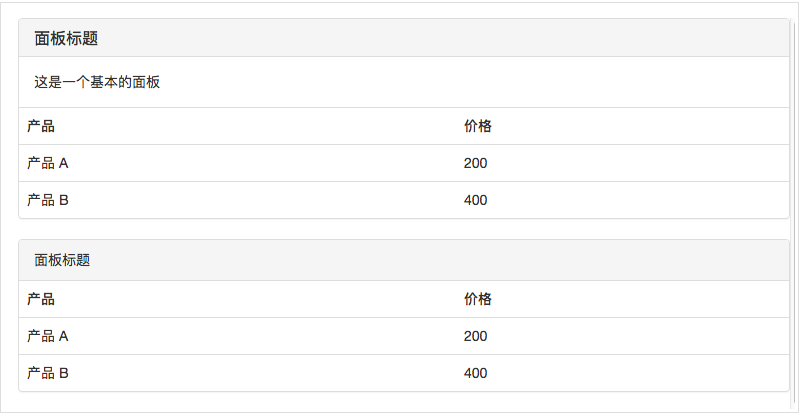
4.帶表格的面板
為了在面板中創建一個無邊框的表格,我們可以在面板中使用 class .table。假設有個 <div> 包含 .panel-body,我們可以向表格的頂部添加額外的邊框用來分隔。如果沒有包含 .panel-body 的 <div>,則組件會無中斷地從面板頭部移動到表格。
下面的實例演示了這點:
<!DOCTYPE html>
<html>
<head>
 <meta charset="utf-8">
 <title>Bootstrap 實例 - 帶表格的面板</title>
 <link rel="stylesheet"  rel="external nofollow" rel="external nofollow" rel="external nofollow" rel="external nofollow" >
 <script src="https://cdn.static.runoob.com/libs/jquery/2.1.1/jquery.min.js"></script>
 <script src="https://cdn.static.runoob.com/libs/bootstrap/3.3.7/js/bootstrap.min.js"></script>
</head>
<body>
<div class="panel panel-primary">
 <div class="panel-heading">
  <h4 class="panel-title">面板標題</h4>
 </div>
 <div class="panel-body">
  這是一個基本的面板
 </div>
 <table class="table">
  <th>產品</th><th>價格 </th>
  <tr><td>產品 A</td><td>200</td></tr>
  <tr><td>產品 B</td><td>400</td></tr>
 </table>
</div>
<div class="panel panel-default">
 <div class="panel-heading">面板標題</div>
 <table class="table">
  <th>產品</th><th>價格 </th>
  <tr><td>產品 A</td><td>200</td></tr>
  <tr><td>產品 B</td><td>400</td></tr>
 </table>
</div>
</body>
</html>

我們可以看到,第一個表格和第二個表格,有一些不同,第一個含有.panel-body樣式,所以,可以分隔表格和頭內容。
二、Bootstrap 多媒體對象(Media Object)
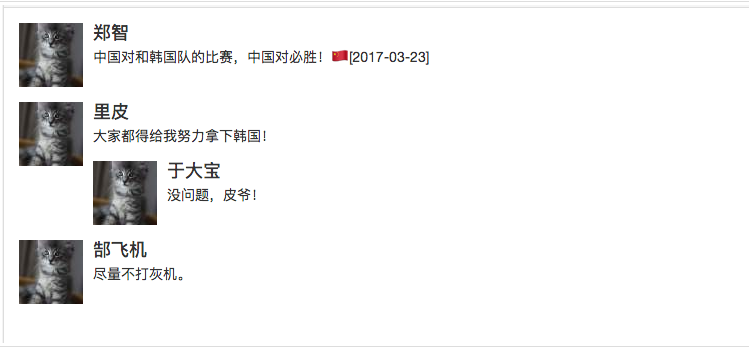
本章我們將講解 Bootstrap 中的多媒體對象(Media Object)。這些抽象的對象樣式用于創建各種類型的組件(比如:博客評論),我們可以在組件中使用圖文混排,圖像可以左對齊或者右對齊。媒體對象可以用更少的代碼來實現媒體對象與文字的混排。
媒體對象輕量標記、易于擴展的特性是通過向簡單的標記應用 class 來實現的。你可以在 HTML 標簽中添加以下兩種形式來設置媒體對象:
.media:該 class 允許將媒體對象里的多媒體(圖像、視頻、音頻)浮動到內容區塊的左邊或者右邊。
.media-list:如果你需要一個列表,各項內容是無序列表的一部分,可以使用該 class。可用于評論列表與文章列表。
讓我們來看看下面這個有關默認的媒體對象 .media 的實例:
<!DOCTYPE html>
<html>
<head>
 <meta charset="utf-8">
 <title>Bootstrap 實例 - 默認的媒體對象</title>
 <link rel="stylesheet"  rel="external nofollow" rel="external nofollow" rel="external nofollow" rel="external nofollow" >
 <script src="https://cdn.static.runoob.com/libs/jquery/2.1.1/jquery.min.js"></script>
 <script src="https://cdn.static.runoob.com/libs/bootstrap/3.3.7/js/bootstrap.min.js"></script>
</head>
<body>
<div class="media">
 <a class="pull-left" href="#" rel="external nofollow" rel="external nofollow" rel="external nofollow" rel="external nofollow" >
  <img class="media-object" src="/wp-content/uploads/2014/06/64.jpg" alt="媒體對象">
 </a>
 <div class="media-body">
  <h5 class="media-heading">鄭智</h5>
  中國對和韓國隊的比賽,中國對必勝!🇨🇳 [2017-03-23]
 </div>
</div>
<div class="media">
 <a class="pull-left" href="#" rel="external nofollow" rel="external nofollow" rel="external nofollow" rel="external nofollow" >
  <img class="media-object" src="/wp-content/uploads/2014/06/64.jpg" alt="媒體對象">
 </a>
 <div class="media-body">
  <h5 class="media-heading">里皮</h5>
  大家都得給我努力拿下韓國!
  <div class="media">
   <a class="pull-left" href="#" rel="external nofollow" rel="external nofollow" rel="external nofollow" rel="external nofollow" >
    <img class="media-object" src="/wp-content/uploads/2014/06/64.jpg" alt="媒體對象">
   </a>
   <div class="media-body">
    <h5 class="media-heading">于大寶</h5>
    沒問題,皮爺!
   </div>
  </div>
 </div>
</div>
<div class="media">
 <a class="pull-left" href="#" rel="external nofollow" rel="external nofollow" rel="external nofollow" rel="external nofollow" >
  <img class="media-object" src="/wp-content/uploads/2014/06/64.jpg" alt="媒體對象">
 </a>
 <div class="media-body">
  <h5 class="media-heading">郜飛機</h5>
  盡量不打灰機。
 </div>
</div>
</body>
</html>

以上所述是小編給大家介紹的Bootstrap常用組件學習(整理),希望對大家有所幫助,如果大家有任何疑問請給我留言,小編會及時回復大家的。在此也非常感謝大家對億速云網站的支持!
免責聲明:本站發布的內容(圖片、視頻和文字)以原創、轉載和分享為主,文章觀點不代表本網站立場,如果涉及侵權請聯系站長郵箱:is@yisu.com進行舉報,并提供相關證據,一經查實,將立刻刪除涉嫌侵權內容。