溫馨提示×
您好,登錄后才能下訂單哦!
點擊 登錄注冊 即表示同意《億速云用戶服務條款》
您好,登錄后才能下訂單哦!
這篇文章主要介紹微信小程序中后臺登錄的示例分析,文中介紹的非常詳細,具有一定的參考價值,感興趣的小伙伴們一定要看完!
微信小程序 后臺登錄
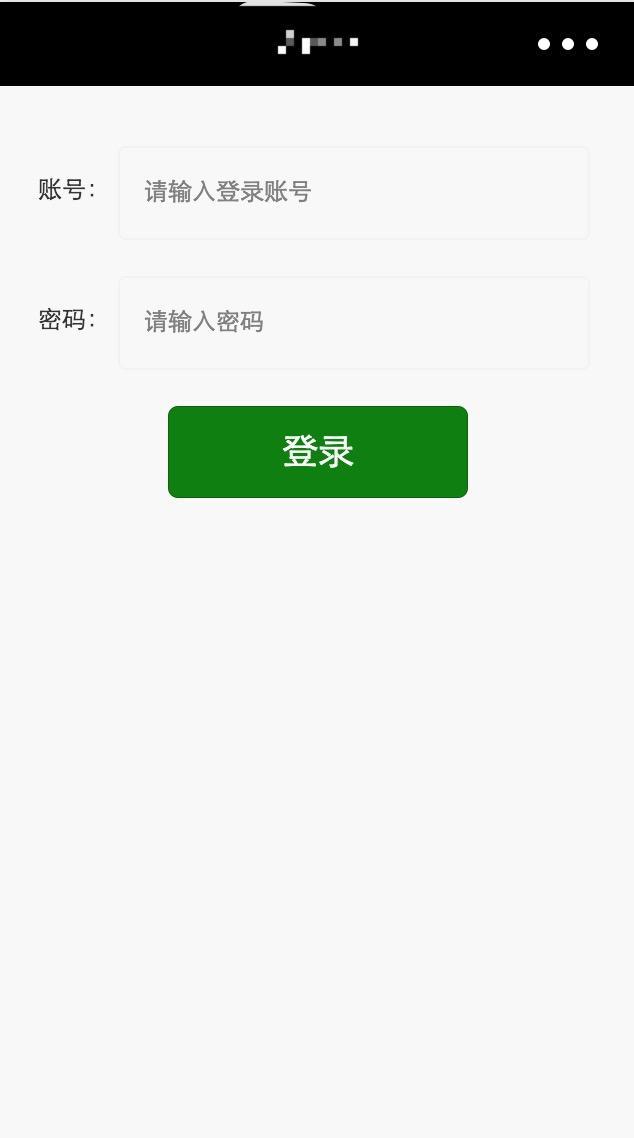
實現效果圖:

最近寫了一個工具類的小程序,按需求要求不要微信提供的微信賬號登錄,需要調取后臺登錄接口來登錄。由于小程序大部分都是調取微信信息登錄,很少有調用自己后臺來登錄的,所以寫的時候各種坑,現在把趟好坑的代碼共享給大家吧!(PS:如有不妥之處,共勉之。)

廢話不說,直接上代碼
找到app.js在里面寫如下代碼
App({
 onLaunch: function () {
  //調用API從本地緩存中獲取數據
  var logs = wx.getStorageSync('logs') || []
  logs.unshift(Date.now())
  wx.setStorageSync('logs', logs)
 },
 globalData: {
  adminUserViewId: "",
  token: "",
  userInfo: null,
  BaseURL:"http://airb.cakeboss.com.cn"
  // BaseURL:"http://192.168.0.107:8080"
 },
敲黑板劃重點:上圖中的代碼片段重要的地方就是:“globalData中的 adminUserViewId: "",token: "" ”
這兩個參數是前端需要存儲的后臺參數,用來標記用戶的登錄狀態的。
然后建一個login文件夾,在login.wxml中寫如下代碼
<import src="../../components/toast.wxml" />

<!-- is="toast" 匹配組件中的toast提示 如果用dialog的話這就是dialog -->
<template is="toast" data="{{ ...$wux.toast }}" />
<view class="login_container">
 <view class="login_view">
  <text class="login_lable">賬號:</text>
  <input class="login_text" placeholder="請輸入登錄賬號" bindinput="listenerUsernameInput"/>
 </view>
 <view class="login_view">
  <text class="login_lable">密碼:</text>
  <input class="login_text" placeholder="請輸入密碼" password="true" bindinput="listenerPasswordInput"/>
 </view>
 <view>
  <button class="login_button" bindtap="loginAction">登錄</button>
 </view>
</view>
然后建一個login文件夾,在login.wxss中寫如下代碼
.login_container {
 margin-top: 30px;
}

.login_view {
 width: calc(100% - 40px);
 padding: 0 20px;
 line-height: 45px;
 height: 45px;
 margin-bottom: 20px;
}

.login_text {
 float: left;
 height: 45px;
 line-height: 45px;
 font-size: 12px;
 border: 1px solid rgb(241, 242, 243);
 padding: 0 12px;
 width: calc(100% - 70px);
 border-radius: 4px;
}

.login_lable {
 float: left;
 font-size: 12px;
 width: 40px;
}

.login_button {
 width: 150px;
 background: green;
 color: #fff;
}
在login.js中寫如下代碼
//login.js
//獲取應用實例
var app = getApp()
var util = require('../../utils/util.js');

Page({
 data: {
  motto: 'Hello World',
  username: "",
  password: ""
 },
 onLoad(options) {
  // 初始化提示框
  this.$wuxToast = app.wux(this).$wuxToast
 },
 /** 監聽帳號輸入 */
 listenerUsernameInput: function (e) {
  this.data.username = e.detail.value;
 },
 /** 監聽密碼輸入 */
 listenerPasswordInput: function (e) {
  this.data.password = e.detail.value;
 },
 // 登錄按鈕點擊事件
 loginAction: function () {

  var userName = this.data.username;
  var passwords = this.data.password;
  var that = this;

  if (userName === "") {
   that.$wuxToast.show({
    type: 'text',
    timer: 1000,
    color: '#fff',
    text: "用戶名不能為空!",
    success: () => console.log('用戶名不能為空!')
   })
   return;
  } if (passwords === "") {
   that.$wuxToast.show({
    type: 'text',
    timer: 1000,
    color: '#fff',
    text: "密碼不能為空!",
    success: () => console.log('密碼不能為空!')
   })
   return;
  }

  //加載提示框
  util.showLoading("登錄中...");

  var urlStr = app.globalData.BaseURL + '/api/adminUser/login';
  wx.request({
   method: "POST",
   url: urlStr, //僅為示例,并非真實的接口地址
   data: util.json2Form({
    username: userName,
    password: passwords
   }),
   header: {
    "Content-Type": "application/x-www-form-urlencoded"
   },
   success: function (res) {
    util.hideToast();
    console.log(res.data);
    var code = res.data.code;
    if (code === 200) {
     // 后臺傳遞過來的值
     var adminUserViewId = res.data.data.adminUserViewId;
     var token = res.data.data.token;
     // 設置全局變量的值
     app.globalData.adminUserViewId = res.data.data.adminUserViewId;
     app.globalData.token = res.data.data.token;
     // 將token存儲到本地
     wx.setStorageSync('adminUserViewId', adminUserViewId);
     wx.setStorageSync('token', token);
     console.log("登錄成功的adminUserViewId:" + adminUserViewId);
     console.log("登錄成功的token:" + token);
     // 切換到首頁
     wx.switchTab({
      url: '/pages/index/index'
     })
    } else {
     that.$wuxToast.show({
      type: 'text',
      timer: 1000,
      color: '#fff',
      text: res.data.msg,
      success: () => console.log('登錄失敗,請稍后重試。' + res.data.msg)
     })
    }
   },
   fail: function () {
    util.hideToast();
    console.log("登錄失敗");
    that.$wuxToast.show({
     type: 'text',
     timer: 1000,
     color: '#fff',
     text: '服務器君好累?,請稍后重試',
     success: () => console.log('登錄失敗,請稍后重試。')
    })
   }
  })
 }
})
以上是“微信小程序中后臺登錄的示例分析”這篇文章的所有內容,感謝各位的閱讀!希望分享的內容對大家有幫助,更多相關知識,歡迎關注億速云行業資訊頻道!
免責聲明:本站發布的內容(圖片、視頻和文字)以原創、轉載和分享為主,文章觀點不代表本網站立場,如果涉及侵權請聯系站長郵箱:is@yisu.com進行舉報,并提供相關證據,一經查實,將立刻刪除涉嫌侵權內容。