您好,登錄后才能下訂單哦!
您好,登錄后才能下訂單哦!
這篇文章給大家分享的是有關vue中怎么實現省市區三聯動下拉選擇組件的內容。小編覺得挺實用的,因此分享給大家做個參考,一起跟隨小編過來看看吧。
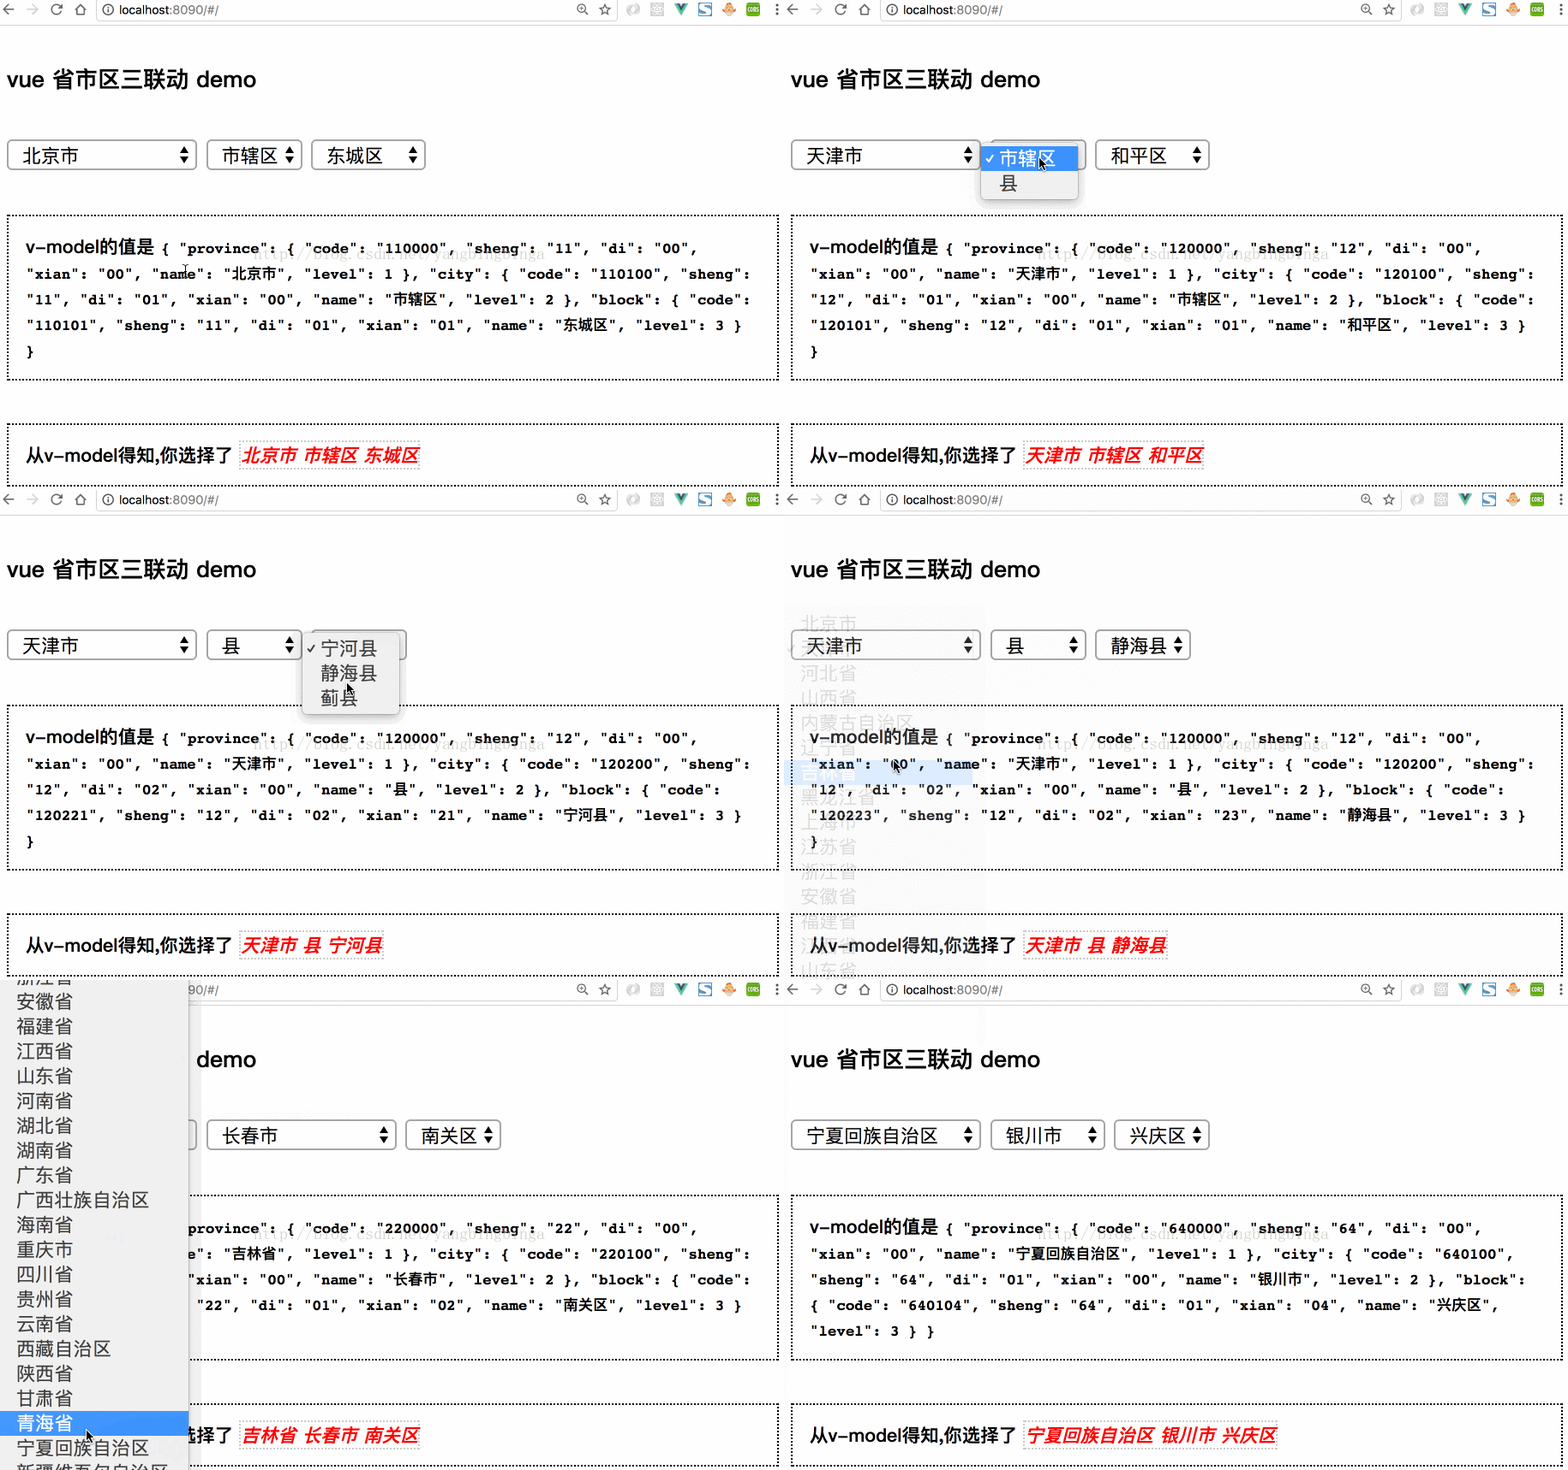
首先來看一下最終的效果(沒有寫太多的樣式...)

組件所需要的省市區的JSON數據(已經封裝為commonjs模塊了): provinces.js
這個數據中有這樣幾個字段:
code: 當前省市區的編碼
sheng: 當前所在的省
name: 省市區的名字
level: 級別,省 level = 1, 市 level=2, 區/縣城 level = 3
di: 縣,市級別的區分
如何使用?
這里采用了 v-model暴露接口, 所以我們下拉選擇的值,你只需要在 v-model綁定的屬性中去拿即可
我們使用的字段是 cityInfo用于接收組件的數據, 組件為了返回足夠的數據, 它是一個對象
使用代碼示例 :
App.vue
<template>
 <div id="app">
 <h6>vue 省市區三聯動 demo</h6>
 <city-select v-model="cityInfo"></city-select>
 <h7>v-model的值是 <code>{{ cityInfo }}</code></h7>
 <h7>從v-model得知,你選擇了 <i>{{ cityName }}</i></h7>
 </div>
</template>
<script>
 import CitySelect from './components/CitySelect.vue'
 export default {
 data() {
 return {
 cityInfo: '',
 }
 },
 components: {
 CitySelect
 },
 computed: {
 cityName() {
 const names = [];
 this.cityInfo.province && names.push(this.cityInfo.province.name + ' ')
 this.cityInfo.city && names.push(this.cityInfo.city.name + ' ')
 this.cityInfo.block && names.push(this.cityInfo.block.name + ' ')
 return names.join('')
 }
 }
 }
</script>
<style lang="stylus">
 h7
 padding 10px
 border 1px dotted
 h7 i
 color #f00
 border 1px dotted #ccc
</style>
cityName是我們需要展示的數據,作為一個計算屬性而存在,因為這個值是不斷變化的,從cityInfo中抽取出來的數據
下面我們來看一下組件的實現代碼
CitySelect.vue
<template>
 <div class="city-select">
 <select v-model="selectedProvince" name="province">
 <option v-for="(item, index) in provinces"
 v-if="item.level === 1"
 :value="item">
 {{ item.name }}
 </option>
 </select>
 <select v-model="selectedCity" name="city">
 <option
 v-for="(item, index) in cities"
 :value="item">
 {{ item.name }}
 </option>
 </select>
 <select v-model="selectedBlock" name="block">
 <option
 v-for="(item, index) in blocks"
 :value="item">
 {{ item.name }}
 </option>
 </select>
 </div>
</template>
<script>
/**
 * 省 市 區/縣城 三聯動選擇器
*/
import provinces from './provinces.js'
import Vue from 'vue'
export default {
 name: 'app',
 created() {
 // 數據初始化,默認選中北京市,默認選中第一個;北京市數據為總數據的前18個
 let beijing = this.provinces.slice(0, 19)
 this.cities = beijing.filter(item => {
 if (item.level === 2) {
 return true
 }
 })
 this.selectedCity = this.cities[0]
 this.blocks = beijing.filter(item => {
 if (item.level === 3) {
 return true
 }
 })
 this.selectedBlock = this.blocks[0]
 },
 watch: {
 selectedProvince(newVal, oldVal) {
 // 港澳臺數據只有一級,特殊處理
 if (newVal.sheng === '71' || newVal.sheng === '81' || newVal.sheng === '82') {
 this.cities = [newVal]
 this.blocks = [newVal]
 } else {
 this.cities = this.provinces.filter(item => {
  if (item.level === 2 && item.sheng && newVal.sheng === item.sheng) {
  return true
  }
 })
 }
 var _this = this
 // 此時在渲染DOM,渲染結束之后再選中第一個
 Vue.nextTick(() => {
 _this.selectedCity = _this.cities[0]
 _this.$emit('input', _this.info)
 })
 },
 selectedBlock() {
 var _this = this
 Vue.nextTick(() => {
 _this.$emit('input', _this.info)
 })
 },
 selectedCity(newVal) {
 // 選擇了一個市,要選擇區了 di是城市的代表,sheng
 if (newVal.sheng === '71' || newVal.sheng === '81' || newVal.sheng === '82') {
 this.blocks = [newVal]
 this.cities = [newVal]
 } else {
 this.blocks = this.provinces.filter(item => {
  if (item.level === 3 && item.sheng && item.sheng == newVal.sheng && item.di === newVal.di && item.name !== '市轄區') {
  return true
  }
 })
 }
 var _this = this
 Vue.nextTick(() => {
 _this.selectedBlock = _this.blocks[0]
 // 觸發與 v-model相關的 input事件
 _this.$emit('input', _this.info)
 })
 }
 },
 computed: {
 info() {
 return {
 province: this.selectedProvince,
 city: this.selectedCity,
 block: this.selectedBlock
 }
 }
 },
 data() {
 return {
 selectedProvince: provinces[0],
 selectedCity: 0,
 selectedBlock: 0,
 cities: 0,
 provinces,
 blocks: 0
 }
 }
}
</script>
<style lang="stylus" scoped>
 .city-select select
 outline 0
</style>
組件關鍵點說明:
HTML模板采用三個 select下拉控件,分別具有v-model由于綁定選擇的數據,使用v-for遍歷省市區數據
data中的數據,分別是選中的省市區的值(對象形式); 以及當前這個省的城市,這個城市的區,見名知意
在create鉤子函數中我們進行了數據的初始化,默認我們顯示北京相關的信息,改變v-model對應的屬性值
實現三聯動的重點:
我們使用watch監測當前省市區的改變(v-model中綁定的數據),一旦省 有變化,就需要拉取這個省相關的數據,并且默認選中第一條數據; 市,區的變化類似。
在這里我們采用了 ES5中的filter來進行數據的過濾,我們只要把數據過濾出來了,vue自動幫我們重新渲染,所以我們只需要把重點放在數據的篩選上就可以了
v-model接口的暴露:
要將數據綁定到v-model所綁定的屬性上,需要通過觸發 input事件,參見 v-model的實現原理這篇文章
Vue.nextTick(() => {
 _this.$emit('input', _this.info)
 })
也就是這行代碼實現了組件內部數據暴露的效果: v-model所綁定的cityInfo拿到了組件內部的值
這里的 nextTick類似于setTimeout實現的效果,可以在執行完其他任務(例如渲染DOM)之后再執行相應的回調,我們使用它,可以保證我們的下一步操作是在DOM渲染完畢之后再執行的,保證邏輯的正確性
感謝各位的閱讀!關于“vue中怎么實現省市區三聯動下拉選擇組件”這篇文章就分享到這里了,希望以上內容可以對大家有一定的幫助,讓大家可以學到更多知識,如果覺得文章不錯,可以把它分享出去讓更多的人看到吧!
免責聲明:本站發布的內容(圖片、視頻和文字)以原創、轉載和分享為主,文章觀點不代表本網站立場,如果涉及侵權請聯系站長郵箱:is@yisu.com進行舉報,并提供相關證據,一經查實,將立刻刪除涉嫌侵權內容。