溫馨提示×
您好,登錄后才能下訂單哦!
點擊 登錄注冊 即表示同意《億速云用戶服務條款》
您好,登錄后才能下訂單哦!
本篇文章為大家展示了怎么在vue中利用遞歸組件實現一個樹形控件,內容簡明扼要并且容易理解,絕對能使你眼前一亮,通過這篇文章的詳細介紹希望你能有所收獲。
vue版的樹形控件
<!DOCTYPE html>
<html lang="en">
<head>
  <meta charset="UTF-8">
  <meta name="viewport" content="width=device-width, initial-scale=1.0">
  <meta http-equiv="X-UA-Compatible" content="ie=edge">
  <title>樹形結構2</title>
</head>
<body>
  <div id = "app">
    <tree :folder = "trees" :select = "select"></tree>
  </div>
  <script src="https://cdn.jsdelivr.net/npm/vue/dist/vue.js"></script>
  <script>
    Vue.component('tree', {
      name:"tree",
      template:`<ul>
            <li v-for = "item in folder">
              <span @click = "select(item)">{{ item.label }}</span>
              <tree v-if = "item.children" :folder = "item.children" :select = "select"></tree>
            </li>
          </ul>`,
      props:["folder","select"],
    })
    // <tree v-if = "item.children" :folder = "item.children"></tree>
    var app = new Vue({
      el:"#app",
      data:{
        msg:"hello world",
        trees: [
          {
            id:1,
            label:"1級目錄1",
            show:false,
            children:[
              {
                id:"1-1",
                label:"1.1目錄"
              },
              {
                id:"1-2",
                label:"1.2目錄"
              },
              {
                id:"1-3",
                label:"1.3目錄"
              },
            ]
          },
          {
            id:2,
            label:"1級目錄2",
            show:false
          },
          {
            id:3,
            label:"1級目錄3",
            show:false,
            children:[
              {
                id:"3-1",
                label:"3.1目錄"
              },
              {
                id:"3-2",
                label:"3.2目錄",
                show:false,
                children:[
                  {
                    id:"3-2-1",
                    label:"3.2.1目錄"
                  },
                  {
                    id:"3-2-2",
                    label:"3.2.2目錄"
                  },
                  {
                    id:"3-2-3",
                    label:"3.2.3目錄"
                  }
                ]
              }
            ]
          },
          {
            id:4,
            label:"1級目錄4",
            show:false,
            children:[
              {
                id:"4-1",
                label:"4.1目錄"
              },
              {
                id:"4-2",
                label:"4.2目錄",
                show:false,
                children:[
                  {
                    id:"4-2-1",
                    label:"4.2.1目錄"
                  }
                ]
              }
            ]
          },
          {
            id:5,
            label:"1級目錄5",
            show:false,
            children:[
              {
                id:"5-1",
                label:"5.1目錄",
                show:false,
                children:[
                  {
                    id:"5-1-1",
                    label:"5.1.1目錄"
                  },
                  {
                    id:"5-1-2",
                    label:"5.1.2目錄",
                    show:false,
                    children:[
                      {
                        id:"5-1-2-1",
                        label:"5.1.2.1目錄"
                      },
                    ]
                  }
                ]
              },
              {
                id:"5-2",
                label:"5.2目錄",
                show:false
              }
            ]
          },
        ]
      },
      methods:{
        clickHandler(){
          console.log(23333);
        },
        select(data){
          console.log(data);
        }
      },
      mounted(){
        console.log(this.trees);
      }
    })
  </script>
</body>
</html>
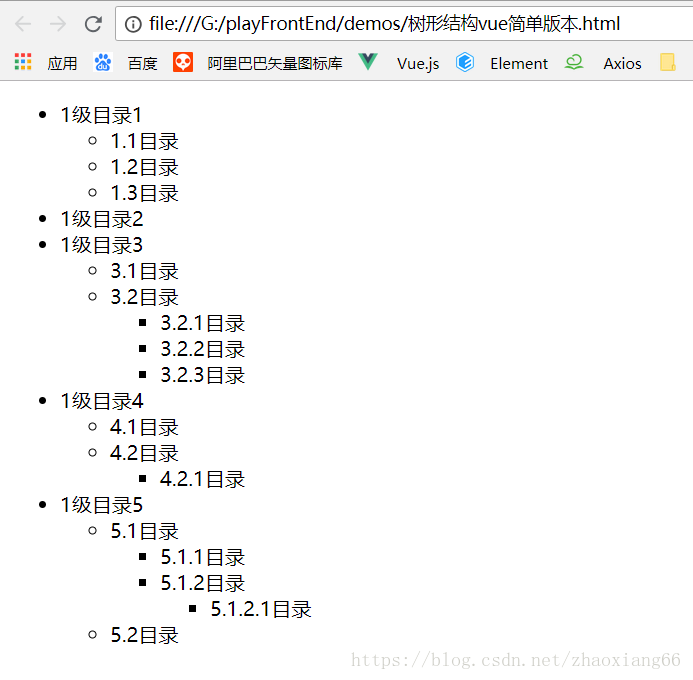
看下結果

當然我用的全局組件,如果用vue-cli搭建的環境是一樣的,引入組件就可以了,但是一定要注意,組件內必須要用name屬性,而且name的名稱要和組件名稱(組件標簽名稱)一致才可以
貼一個項目中用的模板吧,相當于做筆記了
<template>
  <ul class = "dataBaseTree">
    <li v-for = "(item,index) in folder" :key = "index">
      <span @click = "select(item)" :class = "{'active':currentId == item.id}">
        <i class = "folderIcon" v-if = "item.children">
          <icon :icon = "'xiala'" v-if = "item.show"></icon>
          <icon :icon = "'xiala2'" v-else></icon>
        </i>
        {{ item.label }}
      </span>
      <el-collapse-transition>
        <DatabaseTree v-if = "item.children && item.show" :folder = "item.children" :select = "select" :currentId = "currentId"></DatabaseTree>
      </el-collapse-transition>
    </li>
  </ul>
</template>

<script>
  import { mapGetters , mapActions} from 'vuex';
  export default{
    name:"DatabaseTree",
    props:["folder","select","currentId"],
    data(){
      return{
        addParams:{
          label:"",
          children:[]
        },
        noteData:{
          children:[]
        }
      }
    },
     computed:{
      ...mapGetters(["catalog"])
    },
    methods:{}
  }
</script>

<style lang="scss" scoped>
  .dataBaseTree{
    padding-left:12%;
    line-height:40px;
    ul{
      padding-left:12%;
      line-height:40px;
      li{
        span{
          display:inline-block;
          padding-left:23%;
          height:100%;
          width:120%;
          color:#ababab;
          font-size:14px;
          position: relative;
          cursor: pointer;
          &:hover{
            background: #EDF0F5;
          }
          .folderIcon{
            color:#BCBCBC;
            position: absolute;
            top:-1px;
            left:22px;
          }
        }
      }
    }
    li{
      position: relative;
      span{
        display:inline-block;
        padding-left:40px;
        font-size:14px;
        height:100%;
        width:120%;
        cursor: pointer;
        position: relative;
        right:25px;
        top:-2px;
        color:#ababab;
        &:hover{
          background: #EDF0F5;
        }
        .titleIcon{
          color:#C3C3C3;
          font-size:16px;
          position: absolute;
          top:12px;
          left:16px;
        }
        .folderIcon{
          color:#BCBCBC;
          position: absolute;
          top:-1px;
          left:22px;
        }
      }
      .active{
        background: #EDF0F5;
      }
    }
  }
</style>
vue版的就到這里了
下面貼一個原生js版的,感興趣的小伙伴可以繼續往下看
<!DOCTYPE html>
<html lang="en">
<head>
  <meta charset="UTF-8">
  <meta name="viewport" content="width=device-width, initial-scale=1.0">
  <meta http-equiv="X-UA-Compatible" content="ie=edge">
  <title>Document</title>
</head>
<body>
  <script>
    var tree=[
        {
          id:1,
          label:"1級目錄1",
          children:[
            {
              id:"1-1",
              label:"1.1目錄"
            },
            {
              id:"1-2",
              label:"1.2目錄"
            },
            {
              id:"1-3",
              label:"1.3目錄"
            },
          ]
        },
        {
          id:2,
          label:"1級目錄2",
        },
        {
          id:3,
          label:"1級目錄3",
          children:[
            {
              id:"3-1",
              label:"3.1目錄"
            },
            {
              id:"3-2",
              label:"3.2目錄",
              children:[
                {
                  id:"3-2-1",
                  label:"3.2.1目錄"
                },
                {
                  id:"3-2-2",
                  label:"3.2.2目錄"
                },
                {
                  id:"3-2-3",
                  label:"3.2.3目錄"
                }
              ]
            }
          ]
        },
        {
          id:4,
          label:"1級目錄4",
          children:[
            {
              id:"4-1",
              label:"4.1目錄"
            },
            {
              id:"4-2",
              label:"4.2目錄",
              children:[
                {
                  id:"4-2-1",
                  label:"4.2.1目錄"
                }
              ]
            }
          ]
        },
        {
          id:5,
          label:"1級目錄5",
          children:[
            {
              id:"5-1",
              label:"5.1目錄",
              children:[
                {
                  id:"5-1-1",
                  label:"5.1.1目錄"
                },
                {
                  id:"5-1-2",
                  label:"5.1.2目錄",

                  children:[
                    {
                      id:"5-1-2-1",
                      label:"5.1.2.1目錄"
                    },
                  ]
                }
              ]
            },
            {
              id:"5-2",
              label:"5.2目錄"
            }
          ]
        },
      ];
    var render = function(tree) {
      if (!tree) return null
      var ul = document.createElement('ul');
      for(var i = 0; i < tree.length;i++){
        var li = document.createElement('li')
        // 創建span標簽
        var span = document.createElement('span'); span.innerText = tree[i].label;
        li.appendChild(span);
        if(tree[i].children){
          var sub = render(tree[i].children);
          li.appendChild(sub);
        }
        ul.appendChild(li);
      }
      return ul
    };
    document.body.innerHTML = '';
    document.body.appendChild(render(tree));
  </script>
</body>
</html>
上述內容就是怎么在vue中利用遞歸組件實現一個樹形控件,你們學到知識或技能了嗎?如果還想學到更多技能或者豐富自己的知識儲備,歡迎關注億速云行業資訊頻道。
免責聲明:本站發布的內容(圖片、視頻和文字)以原創、轉載和分享為主,文章觀點不代表本網站立場,如果涉及侵權請聯系站長郵箱:is@yisu.com進行舉報,并提供相關證據,一經查實,將立刻刪除涉嫌侵權內容。