您好,登錄后才能下訂單哦!
您好,登錄后才能下訂單哦!
這篇文章給大家分享的是有關vuex工作流程是怎么樣的的內容。小編覺得挺實用的,因此分享給大家做個參考,一起跟隨小編過來看看吧。
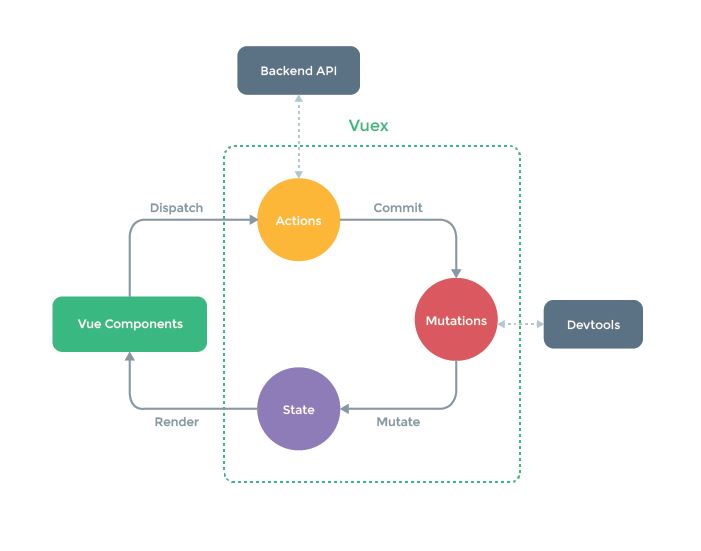
大家都知道vuex是vue的一個狀態管理器,它采用集中式存儲管理應用的所有組件的狀態,并以相應的規則保證狀態以一種可預測的方式發生變化。先看看vuex下面的工作流程圖

通過官方文檔提供的流程圖我們知道,vuex的工作流程,
1、數據從state中渲染到頁面;
2、在頁面通過dispatch來觸發action;
3、action通過調用commit,來觸發mutation;
4、mutation來更改數據,數據變更之后會觸發dep對象的notify,通知所有Watcher對象去修改對應視圖(vue的雙向數據綁定原理)。
使用vuex
理解vuex的工作流程我們就看看vuex在vue中是怎么使用的。
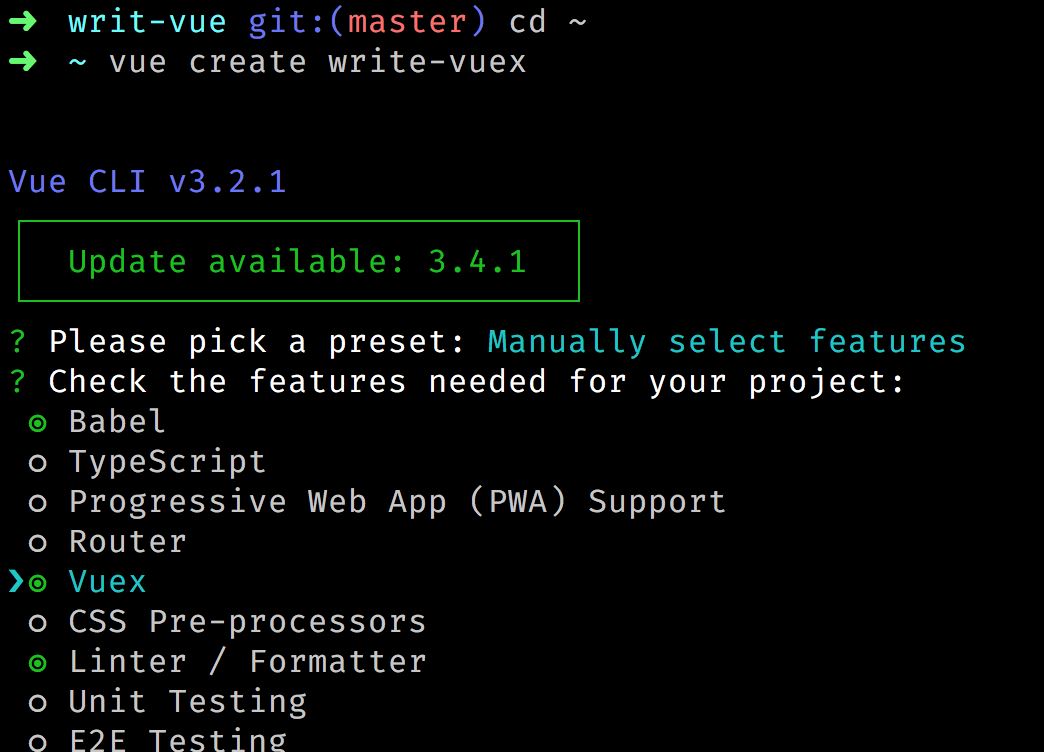
首先用vue-cli創建一個項目工程,如下圖,選擇vuex,然后就是一路的回車鍵

安裝好之后,就有一個帶有vuex的vue項目了。
進入目錄然后看到,src/store.js,在里面加了一個狀態{count: 100},如下
import Vue from 'vue'
import Vuex from 'vuex' // 引入vuex

Vue.use(Vuex) // 使用插件

export default new Vuex.Store({
 state: {
  count: 100 // 加一個狀態
 },
 getter: {

 },
 mutations: {

 },
 actions: {

 }
})
最后在App.vue文件里面使用上這個狀態,如下
<template>
 <div id="app">
  這里是stort------->{{this.$store.state.count}}
 </div>
</template>

<script>
export default {
 name: 'app'
}
</script>

<style>
</style>
項目跑起來就會看到頁面上看到,頁面上會有100了,如下圖

到這里我們使用vuex創建了一個store,并且在我們的App組件視圖中使用,但是我們會有一些列的疑問。
store是如何被使用到各個組件上的??
為什么state的數據是雙向綁定的??
在組件中為什么用this.$store.dispch可以觸發store的actions??
在組件中為什么用this.$store.commit可以觸發store的mutations??
....等等等等
帶著一堆問題,我們來自己實現一個vuex,來理解vuex的工作原理。
安裝并使用store
在src下新建一個vuex.js文件,然后代碼如下
'use strict'

let Vue = null

class Store {
 constructor (options) {
  let { state, getters, actions, mutations } = options
 }
}
// Vue.use(Vuex)
const install = _Vue => {
 // 避免vuex重復安裝
 if (Vue === _Vue) return
 Vue = _Vue
 Vue.mixin({
  // 通過mixins讓每個組件實例化的時候都會執行下面的beforeCreate
  beforeCreate () {
   // 只有跟節點才有store配置,所以這里只走一次
   if (this.$options && this.$options.store) {
    this.$store = this.$options.store
   } else if (this.$parent && this.$parent.$store) { // 子組件深度優先 父 --> 子---> 孫子
    this.$store = this.$parent.$store
   }
  }
 })
}

export default { install, Store }然后修改store.js中的引入vuex模塊改成自己的vuex.js
import Vuex from './vuex' // 自己創建的vuex文件
在我們的代碼中export default { install, Store }導出了一個對象,分別是install和Store
install的作用是,當Vue.use(Vuex)就會自動調用install方法,在install方法里面,我們用mixin混入了一個beforeCreate的生命周期的鉤子函數,使得當每個組件實例化的時候都會調用這個函數。
在beforeCreate中,第一次根組件通過store屬性掛載$store,后面子組件調用beforeCreate掛載的$store都會向上找到父級的$store,這樣子通過層層向上尋找,讓每個組件都掛上了一個$store屬性,而這個屬性的值就是我們的new Store({...})的實例。如下圖

通過層層向上尋找,讓每個組件都掛上了一個$store屬性設置state響應數據
通過上面,我們已經從每個組件都通過this.$store來訪問到我們的store的實例,下面我們就編寫state數據,讓其變成雙向綁定的數據。下面我們改寫store類
class Store {
 constructor (options) {
  let { state, getters, actions, mutations } = options // 拿到傳進來的參數
  this.getters = {}
  this.mutations = {}
  this.actions = {}
  // vuex的核心就是借用vue的實例,因為vuex的數據更改回更新視圖
  this._vm = new Vue({
   data: {
    state
   }
  })
 }
 // 訪問state對象時候,就直接返回響應式的數據
 get state() { // Object.defineProperty get 同理
  return this._vm.state
 }
}傳進來的state對象,通過new Vue({data: {state}})的方式,讓數據變成響應式的。當訪問state對象時候,就直接返回響應式的數據,這樣子在App.vue中就可以通過this.$store.state.count拿到state的數據啦,并且是響應式的呢。
編寫mutations、actions、getters
上面我們已經設置好state為響應式的數據,這里我們在store.js里面寫上mutations、actions、getters,如下
import Vue from 'vue'
import Vuex from './vuex' // 引入我們的自己編寫的文件

Vue.use(Vuex) // 安裝store
// 實例化store,參數數對象
export default new Vuex.Store({
 state: {
  count : 1000
 },
 getters : {
  newCount (state) {
   return state.count + 100
  }
 },
 mutations: {
  change (state) {
   console.log(state.count)
   state.count += 10
  }
 },
 actions: {
  change ({commit}) {
   // 模擬異步
   setTimeout(() => {
    commit('change')
   }, 1000)
  }
 }
})配置選項都寫好之后,就看到getters對象里面有個newCount函數,mutations和actions對象里面都有個change函數,配置好store之后我們在App.vue就可以寫上,dispatch和commit,分別可以觸發actions和mutations,代碼如下
<template>
 <div id="app">
  這里是store的state------->{{this.$store.state.count}} <br/>
  這里是store的getter------->{{this.$store.getters.newCount}} <br/>
  <button @click="change">點擊觸發dispach--> actions</button>
  <button @click="change1">點擊觸發commit---> mutations</button>
 </div>
</template>

<script>
export default {
 name: 'app',
 methods: {
  change () {
   this.$store.dispatch('change') // 觸發actions對應的change
  },
  change1 () {
   this.$store.commit('change') // 觸發mutations對應的change
  }
 },
 mounted () {
  console.log(this.$store)
 }
}
</script>
數據都配置好之后,我們開始編寫store類,在此之前我們先編寫一個循環對象工具函數。
const myforEach = (obj, callback) => Object.keys(obj).forEach(key => callback(key, obj[key]))
// 作用:
// 例如{a: '123'}, 把對象的key和value作為參數
// 然后就是函數運行callback(a, '123')工具函數都準備好了,之后,下面直接縣編寫getters、mutations和actions的實現
class Store {
 constructor (options) {
  let { state = {}, getters = {}, actions = {}, mutations = {} } = options
  this.getters = {}
  this.mutations = {}
  this.actions = {}
  // vuex的核心就是借用vue的實例,因為vuex的數據更改回更新視圖
  this._vm = new Vue({
   data: {
    state
   }
  })
  // 循環getters的對象
  myforEach(getters, (getterName, getterFn) => {
   // 對this.getters對象進行包裝,和vue的computed是差不多的
   // 例如 this.getters['newCount'] = fn(state)
   // 執行 this.getters['newCount']()就會返回計算的數據啦
   Object.defineProperty(this.getters, getterName, {
    get: () => getterFn(state)
   })
  })
  // 這里是mutations各個key和值都寫到,this.mutations對象上面
  // 執行的時候就是例如:this.mutations['change']()
  myforEach(mutations, (mutationName, mutationsFn) => {
   // this.mutations.change = () => { change(state) }
   this.mutations[mutationName] = () => {
    mutationsFn.call(this, state)
   }
  })
  // 原理同上
  myforEach(actions, (actionName, actionFn) => {
   // this.mutations.change = () => { change(state) }
   this.actions[actionName] = () => {
    actionFn.call(this, this)
   }
  })
  const {commit , dispatch} = this // 先存一份,避免this.commit會覆蓋原型上的this.commit
  // 解構 把this綁定好
  // 通過結構的方式也要先調用這類,然后在下面在調用原型的對應函數
  this.commit = type => {
   commit.call(this, type)
  }
  this.dispatch = type => {
   dispatch.call(this, type)
  }
 }
 get state() { // Object.defineProperty 同理
  return this._vm.state
 }
 // commi調用
 commit (type) {
  this.mutations[type]()
 }
 // dispatch調用
 dispatch (type) {
  this.actions[type]()
 }
}通過上面的,我們可以看出,其實mutations和actions都是把傳入的參數,賦值到store實例上的this.mutations和this.actions對象里面。
當組件中this.$store.commit('change')的時候 其實是調用this.mutations.change(state),就達到了改變數據的效果,actions同理。
getters是通過對Object.defineProperty(this.getters, getterName, {})
對this.getters進行包裝當組件中this.$store.getters.newCount其實是調用getters對象里面的newCount(state),然后返回計算結果。就可以顯示到界面上了。
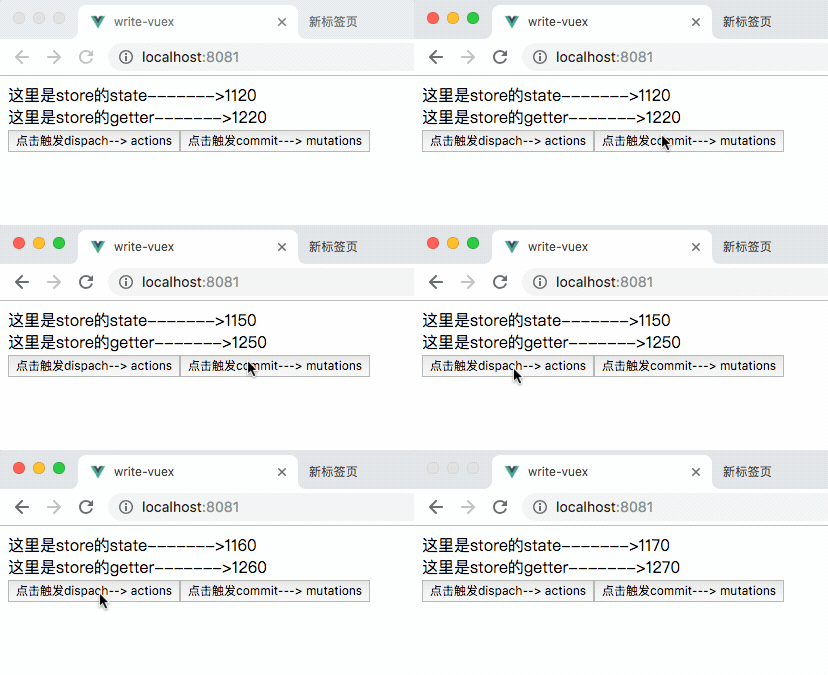
大家看看完成后的效果圖。

到這里大家應該懂了vuex的內部代碼的工作流程了,vuex的一半核心應該在這里了。為什么說一半,因為還有一個核心概念module,也就是vuex的數據的模塊化。
vuex數據模塊化
由于使用單一狀態樹,應用的所有狀態會集中到一個比較大的對象。當應用變得非常復雜時,store 對象就有可能變得相當臃腫。
為了解決以上問題,Vuex 允許我們將 store 分割成模塊(module)。每個模塊擁有自己的 state、mutation、action、getter、甚至是嵌套子模塊——從上至下進行同樣方式的分割
例如下面的store.js
// 實例化store,參數數對象
export default new Vuex.Store({
 modules: {
  // 模塊a
  a: {
   state: {
    count: 4000
   },
   actions: {
    change ({state}) {
     state.count += 21
    }
   },
   modules: {
    // 模塊b
    b: {
     state: {
      count: 5000
     }
    }
   }
  }
 },
 state: {
  count : 1000
 },
 getters : {
  newCount (state) {
   return state.count + 100
  }
 },
 mutations: {
  change (state) {
   console.log(state.count)
   state.count += 10
  }
 },
 actions: {
  change ({commit}) {
   // 模擬異步
   setTimeout(() => {
    commit('change')
   }, 1000)
  }
 }
})然后就可以在界面上就可以寫上this.$store.state.a.count(顯示a模塊count),this.$store.state.a.b.count(顯示a模塊下,b模塊的count),這里還有一個要注意的,其實在組件中調用this.$store.dispatch('change')會同時觸發,根的actions和a模塊的actions里面的change函數。
下面我們就直接去實現models的代碼,也就是整個vuex的實現代碼,
'use strict'

let Vue = null
const myforEach = (obj, callback) => Object.keys(obj).forEach(key => callback(key, obj[key]))

class Store {
 constructor (options) {
  let state = options.state
  this.getters = {}
  this.mutations = {}
  this.actions = {}
  // vuex的核心就是借用vue的實例,因為vuex的數據更改回更新視圖
  this._vm = new Vue({
   data: {
    state
   }
  })

  // 把模塊之間的關系進行整理, 自己根據用戶參數維護了一個對象
  // root._children => a._children => b
  this.modules = new ModulesCollections(options)
  // 無論子模塊還是 孫子模塊 ,所有的mutations 都是根上的
  // 安裝模塊
  installModules(this, state, [], this.modules.root)

  // 解構 把this綁定好
  const {commit , dispatch} = this
  // 通過結構的方式也要先調用這類,然后在下面在調用原型的對應函數
  this.commit = type => {
   commit.call(this, type)
  }
  this.dispatch = type => {
   dispatch.call(this, type)
  }
 }
 get state() { // Object.defineProperty 同理
  return this._vm.state
 }
 commit (type) {
  // 因為是數組,所以要遍歷執行
  this.mutations[type].forEach(fn => fn())
 }
 dispatch (type) {
  // 因為是數組,所以要遍歷執行
  this.actions[type].forEach(fn => fn())
 }
}

class ModulesCollections {
 constructor (options) { // vuex []
  // 注冊模塊
  this.register([], options)
 }
 register (path, rawModule) {
  // path 是空數組, rawModule 就是個對象
  let newModule = {
   _raw: rawModule, // 對象
   _children: {}, // 把子模塊掛載到這里
   state: rawModule.state
  }
  if (path.length === 0) { // 第一次
   this.root = newModule
  } else {
   // [a, b] ==> [a]
   let parent = path.slice(0, -1).reduce((root, current) => {
    return root._children[current]
   }, this.root)
   parent._children[path[path.length - 1]] = newModule
  }
  if (rawModule.modules) {
   // 遍歷注冊子模塊
   myforEach(rawModule.modules, (childName, module) => {
    this.register(path.concat(childName), module)
   })
  }
 }
}

// rootModule {_raw, _children, state }
function installModules (store, rootState, path, rootModule) {
 // rootState.a = {count:200}
 // rootState.a.b = {count: 3000}
 if (path.length > 0) {
  // 根據path找到對應的父級模塊
  // 例如 [a] --> path.slice(0, -1) --> [] 此時a模塊的父級模塊是跟模塊
  // 例如 [a,b] --> path.slice(0, -1) --> [a] 此時b模塊的父級模塊是a模塊
  let parent = path.slice(0, -1).reduce((root, current) => {
   return root[current]
  }, rootState)
  // 通過Vue.set設置數據雙向綁定
  Vue.set(parent, path[path.length - 1], rootModule.state)
 }
 // 設置getter
 if (rootModule._raw.getters) {
  myforEach(rootModule._raw.getters, (getterName, getterFn) => {
   Object.defineProperty(store.getters, getterName, {
    get: () => {
     return getterFn(rootModule.state)
    }
   })
  })
 }
 // 在跟模塊設置actions
 if (rootModule._raw.actions) {
  myforEach(rootModule._raw.actions, (actionName, actionsFn) => {
   // 因為同是在根模塊設置,子模塊也有能相同的key
   // 所有把所有的都放到一個數組里面
   // 就變成了例如 [change, change] , 第一個是跟模塊的actions的change,第二個是a模塊的actions的change
   let entry = store.actions[actionName] || (store.actions[actionName] = [])
   entry.push(() => {
    const commit = store.commit
    const state = rootModule.state
    actionsFn.call(store, {state, commit})
   })
  })
 }
 // 在跟模塊設置mutations, 同理上actions
 if (rootModule._raw.mutations) {
  myforEach(rootModule._raw.mutations, (mutationName, mutationFn) => {
   let entry = store.mutations[mutationName] || (store.mutations[mutationName] = [])
   entry.push(() => {
    mutationFn.call(store, rootModule.state)
   })
  })
 }
 // 遞歸遍歷子節點的設置
 myforEach(rootModule._children, (childName, module) => {
  installModules(store, rootState, path.concat(childName), module)
 })
}

const install = _Vue => {
 // 避免vuex重復安裝
 if (Vue === _Vue) return
 Vue = _Vue
 Vue.mixin({
  // 通過mixins讓每個組件實例化的時候都會執行下面的beforeCreate
  beforeCreate () {
   // 只有跟節點才有store配置
   if (this.$options && this.$options.store) {
    this.$store = this.$options.store
   } else if (this.$parent && this.$parent.$store) { // 子組件深度優先 父 --> 子---> 孫子
    this.$store = this.$parent.$store
   }
  }
 })
}

export default { install, Store }
看到代碼以及注釋,主要流程就是根據遞歸的方式,處理數據,然后根據傳進來的配置,進行操作數據。
至此,我們把vuex的代碼實現了一遍,在我們App.vue的代碼里添加
<template>
 <div id="app">
  這里是store的state------->{{this.$store.state.count}} <br/>
  這里是store的getter------->{{this.$store.getters.newCount}} <br/>
  這里是store的state.a------->{{this.$store.state.a.count}} <br/>
  <button @click="change">點擊觸發dispach--> actions</button>
  <button @click="change1">點擊觸發commit---> mutations</button>
 </div>
</template>
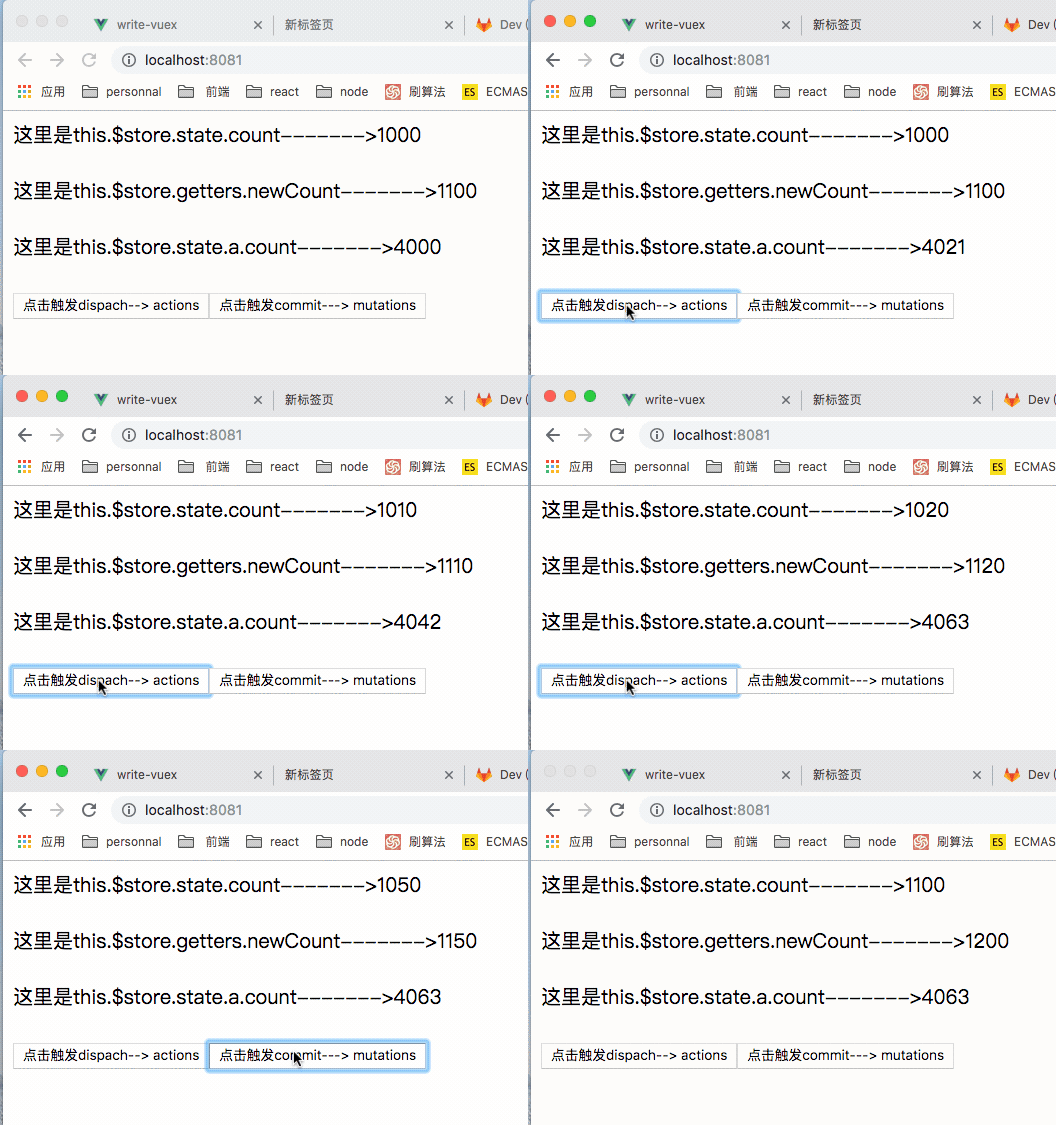
最后查看結果。

感謝各位的閱讀!關于“vuex工作流程是怎么樣的”這篇文章就分享到這里了,希望以上內容可以對大家有一定的幫助,讓大家可以學到更多知識,如果覺得文章不錯,可以把它分享出去讓更多的人看到吧!
免責聲明:本站發布的內容(圖片、視頻和文字)以原創、轉載和分享為主,文章觀點不代表本網站立場,如果涉及侵權請聯系站長郵箱:is@yisu.com進行舉報,并提供相關證據,一經查實,將立刻刪除涉嫌侵權內容。