您好,登錄后才能下訂單哦!
您好,登錄后才能下訂單哦!
本文實例講述了vue學習之Vue-Router用法。分享給大家供大家參考,具體如下:
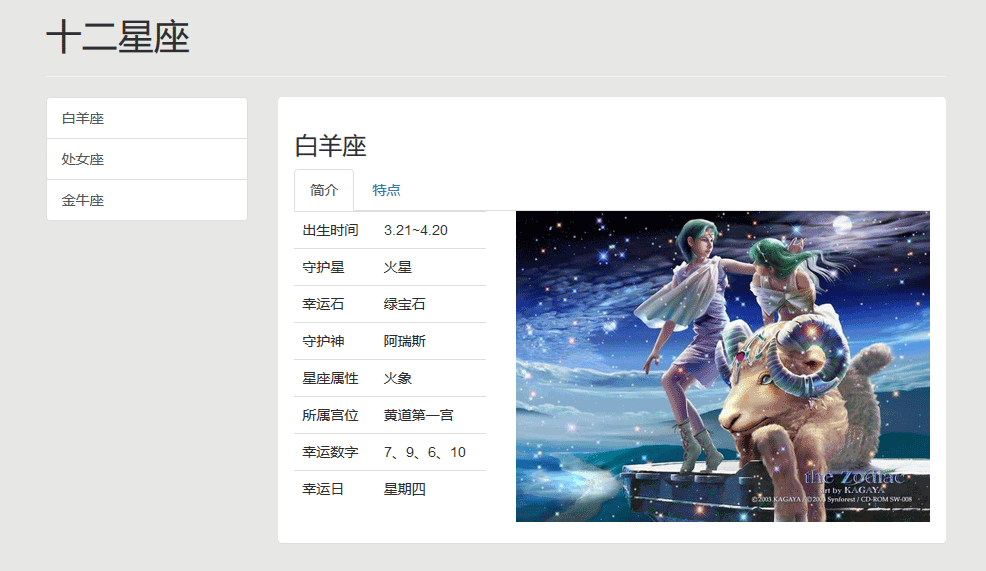
Vue-router就像一個路由器,將組件(components)映射到路由(routes)后,通過點擊<router-link>它可以在<router-view>中將相應的組件渲染出來。
  //1、創建路由組件
  const Link1={template:'#link1'};
  const Link2={template:'#link2'};
  const Link3={template:'#link3'};
  //2、定義路由映射
  const routes=[
    {
      path:'/link1',       //定義相對路徑
      component:Link1,      //定義頁面的組件
      children:[
        {
          path:'intro',      //子路由/link1/intro
          component:{template:'#ariesIntro'},
          name:'ariesIntro',    //為路由命名
        },
        {
          path:'feature',
          component:{template:'#ariesFeature'},
        },
        {path:'/',redirect:'intro'}
      ]
    },
    {path:'/link2',component:Link2},
    {path:'/link3',component:Link3},
    {path:'/',redirect:'/link1'}        //配置根路由,使其重定向到/link1
  ];
  //3、創建router實例
  const router = new VueRouter({
    routes                   //縮寫,相當于 routes: routes
  });
  // 4、 創建和掛載根實例。
  const app = new Vue({
    router
  }).$mount('#app');              //掛載到id為app的div
注意:要設置根路由,頁面加載完成后默認顯示根路由,否則將什么也不顯示。
在頁面中調用路由接口,<router-link> 默認會被渲染成一個 `<a>` 標簽,點擊后在<router-view>渲染指定模板
  <div class="col-lg-offset-2 col-lg-2">
    <!-- 使用 router-link 組件來導航. -->
    <!-- 通過傳入 `to` 屬性指定鏈接. -->
    <router-link class="list-group-item" :to="{name:'ariesIntro'}">白羊座</router-link>
    <router-link class="list-group-item" to="/link2">處女座</router-link>
    <router-link class="list-group-item" to="/link3">金牛座</router-link>
  </div>
  <div class="col-lg-6">
    <div class="panel">
      <div class="panel-body">
        <!-- 路由出口,路由匹配到的組件將渲染在這里 -->
        <router-view></router-view>
      </div>
    </div>
  </div>
通過每個路由內的children數組屬性可以為每個路由再配置子路由,子路由的路徑是基于父路由目錄下的,默認路徑會進行疊加。例如上面再link1中添加intro與feature兩個子路由,在link1模板中使用兩個子路由:
  <template id="link1">
    <div>
      <h4>白羊座</h4>
      <ul class="nav nav-tabs">
        <li class="active">
          <router-link to="/link1/intro">簡介</router-link>
        </li>
        <li><router-link to="/link1/feature">特點</router-link></li>
      </ul>
      <div class="tab-content">
        <router-view></router-view>
      </div>
    </div>
  </template>
最終效果如圖:

在路由路徑中綁定變量,使其根據不同的變量值跳轉到不同頁面,例如將path:"goods/:goodsId",假如當goodsId為15時,就會路由到/goods/15頁面。
通過js代碼控制路由頁面的跳轉與傳值。例如給button綁定事件jump,在methods內實現:
jump(){
  this.$router.push('/cart?goodsId=123')
}
頁面跳轉到根下的cart目錄,并且傳遞參數goodsId,值為123。在cart頁面通過$route.query接收參數,直接在頁面內使用:
注意:區分跳轉是$router,接收參數是$route
<span>商品ID:{{$route.query.goodsId}}</span>
也可以指定頁面向前向后跳轉:this.$router.go(2),向前跳轉兩步 ,向后跳轉一步go(-1)。
當路由路徑過長時,也可以用name屬性為路徑命名,在<router-link>中使用動態綁定:to="{name:'路徑名'}"訪問。例如白羊座的鏈接上使用 :to="{name:'ariesIntro'}",可直接跳轉到link1下的Intro頁面。
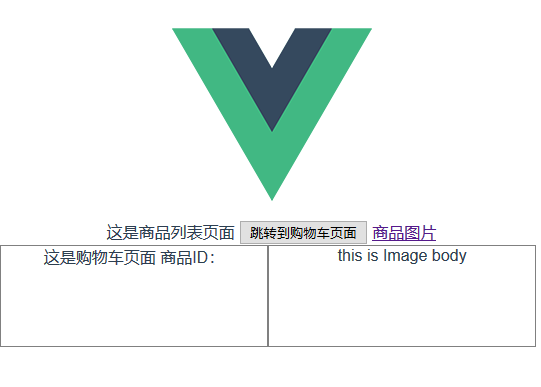
還可以對視圖進行命名,將組件渲染到指定視圖位置,例如在父組件中有一個默認視圖與兩個命名視圖一左一右:
<router-view></router-view>
<router-view class="left" name="cartview"></router-view>
<router-view class="right" name="imgview"></router-view>
在根路由中設置其組件components,將默認視圖渲染為GoodsList,左邊cartview視圖渲染為Cart組件,右邊imgview渲染為Image組件:
new Router({
 routes: [
  {
   path: '/',
   components:{
    default:GoodsList,
    cartview:Cart,
    imgview:Image
   }
}
結果如下:

希望本文所述對大家vue.js程序設計有所幫助。
免責聲明:本站發布的內容(圖片、視頻和文字)以原創、轉載和分享為主,文章觀點不代表本網站立場,如果涉及侵權請聯系站長郵箱:is@yisu.com進行舉報,并提供相關證據,一經查實,將立刻刪除涉嫌侵權內容。