您好,登錄后才能下訂單哦!
您好,登錄后才能下訂單哦!
本文主要講解基于 Vue + Vant ,實現移動端圖片選擇,并用 Canvas 壓縮圖片,最后上傳至服務器。還會封裝一個工具類,方便直接調用。
一、工具類封裝
廢話不多說先上代碼,封裝一個 CompressImageUtils 工具類:
**
 * 圖片壓縮工具類
 * 最大高度和最大寬度都為 500,如果超出大小將等比例縮放。
 *
 * 注意可能出現壓縮后比原圖更大的情況,在調用的地方自己判斷大小并決定上傳壓縮前或壓縮后的圖到服務器。
 */
// 將base64轉換為blob
export function convertBase64UrlToBlob(urlData) {
 let arr = urlData.split(',')
 let mime = arr[0].match(/:(.*?);/)[1]
 let bstr = atob(arr[1])
 let n = bstr.length
 let u8arr = new Uint8Array(n)
 while (n--) {
  u8arr[n] = bstr.charCodeAt(n)
 }
 return new Blob([u8arr], {type: mime})
}

// 壓縮圖片
export function compressImage(path) {
 //最大高度
 const maxHeight = 500;
 //最大寬度
 const maxWidth = 500;
 return new Promise((resolve, reject) => {
  let img = new Image();
  img.src = path;
  img.onload = function () {
   const originHeight = img.height;
   const originWidth = img.width;
   let compressedWidth = img.height;
   let compressedHeight = img.width;
   if ((originWidth > maxWidth) && (originHeight > maxHeight)) {
    // 更寬更高,
    if ((originHeight / originWidth) > (maxHeight / maxWidth)) {
     // 更加嚴重的高窄型,確定最大高,壓縮寬度
     compressedHeight = maxHeight
     compressedWidth = maxHeight * (originWidth / originHeight)
    } else {
     //更加嚴重的矮寬型, 確定最大寬,壓縮高度
     compressedWidth = maxWidth
     compressedHeight = maxWidth * (originHeight / originWidth)
    }
   } else if (originWidth > maxWidth && originHeight <= maxHeight) {
    // 更寬,但比較矮,以maxWidth作為基準
    compressedWidth = maxWidth
    compressedHeight = maxWidth * (originHeight / originWidth)
   } else if (originWidth <= maxWidth && originHeight > maxHeight) {
    // 比較窄,但很高,取maxHight為基準
    compressedHeight = maxHeight
    compressedWidth = maxHeight * (originWidth / originHeight)
   } else {
    // 符合寬高限制,不做壓縮
   }
   // 生成canvas
   let canvas = document.createElement('canvas');
   let context = canvas.getContext('2d');
   canvas.height = compressedHeight;
   canvas.width = compressedWidth;
   context.clearRect(0, 0, compressedWidth, compressedHeight);
   context.drawImage(img, 0, 0, compressedWidth, compressedHeight);
   let base64 = canvas.toDataURL('image/*', 0.8);
   let blob = convertBase64UrlToBlob(base64);
   // 回調函數返回blob的值。也可根據自己的需求返回base64的值
   resolve(blob)
  }
 })
}
定義的最大寬度和最大高度均為 500,如果圖片的寬高至少有一個超出了 500,都會被 **等比例 **壓縮,不用擔心變形。可以根據自己項目需要改變 maxWidth 和 maxHeight 。
這里直接把壓縮的最大高度和最大寬度寫死為 500 了,沒有在調用時傳。因為一個項目壓縮的邏輯和大小一般都一致的,沒必要在每次調用的時候傳。當然如果想寫的靈活一點,可以在 compressImage 方法里再把 maxWidth 、 maxHeight 和壓縮質量傳上。
compressImage 方法返回的是 blob 值,根據服務端接口需要可以改為返回 base64,只需將 resolve(blob) 改為 resolve(base64) 即可。
注意一點,對于有些寬高沒到 500,且分辨率很小的圖片,壓縮之后可能比之前還大。猜測可能是 canvas 生成的圖片分辨率要比原來高一些,所以最終的圖片比壓縮前更大。可以在調用的地方加個判斷,如果壓縮完的大小比原圖小,就上傳壓縮后的圖片;如果如果壓縮完的大小比原圖大,就上傳原圖。
二、如何使用
將 CompressImageUtils 引入到目標文件,然后調用 compressImage 方法,即可在回調里獲得壓縮后的結果。注意 compressImage 方法返回的是 Promise。
省略其他無關代碼,只保留跟壓縮圖片和上傳相關的:
<template>
 <div>
  <van-uploader v-model="fileList" :after-read="afterRead" />
 </div>
</template>
<script>
 import {compressImage} from '../../utils/CompressImageUtils'
 export default {
  components: {},
  methods: {
   //讀取完圖片后
   afterRead(file) {
    console.log('afterRead------', file);
    this._compressAndUploadFile(file);
   },
   //壓縮圖片上傳
   _compressAndUploadFile(file) {
    compressImage(file.content).then(result => {
     console.log('壓縮后的結果', result); // result即為壓縮后的結果
     console.log('壓縮前大小', file.file.size);
     console.log('壓縮后大小', result.size);
     if (result.size > file.file.size){
      console.log('上傳原圖');
      //壓縮后比原來更大,則將原圖上傳
      this._uploadFile(file.file, file.file.name);
     } else {
      //壓縮后比原來小,上傳壓縮后的
      console.log('上傳壓縮圖');
      this._uploadFile(result, file.file.name)
     }
    })
   },
   //上傳圖片
   _uploadFile(file, filename) {
    let params = new FormData();
    params.append("file", file, filename);
    this.$api.uploadImage(params).then(res => {
     console.log('uploadImage', res);
   //上傳成功,寫自己的邏輯
    }).catch(err => {
     console.log('err', err);
    });
   },
  }
 }
</script>
在返回結果中加了層判斷,壓縮后比原來更大,則將原圖上傳;壓縮后比原來小,上傳壓縮后的。解決壓縮后比原圖更大的情況。
this.$api.uploadImage(params) 是調用封裝的 api 方法,如下:
//上傳圖片
 uploadImage(params){
  return axios.post(`${base}/api/v1/file`, params, {
   headers: {'content-type': 'multipart/form-data'}
  })
 },
三、使用效果
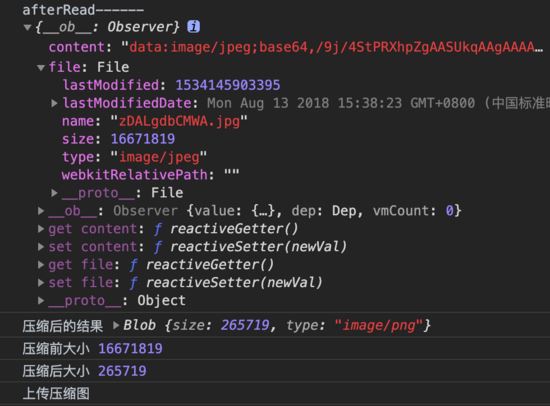
先上傳一個非常大的,尺寸為 6016 × 4016,16.8M 的大圖,看輸出日志,壓縮后大小僅為 260k 左右。此時判斷壓縮后比壓縮前小,上傳壓縮圖到服務器。

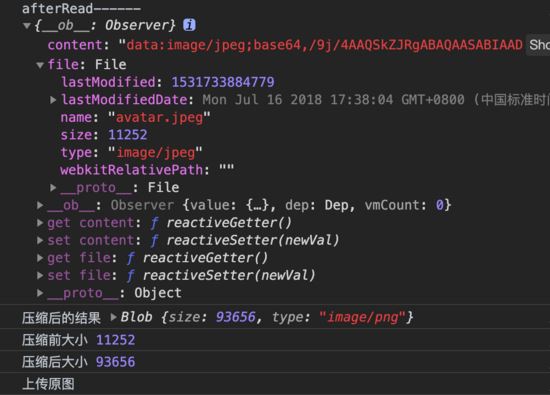
再看個尺寸 300 × 300,12k 的小圖,壓縮前大小是 11252,壓縮后大小是 93656,大了很多。此時判斷壓縮后比壓縮前更大,上傳的是原圖。

總結:這個工具類對大圖的壓縮效果很明顯,不管多大的圖,壓縮之后基本不會超過 300k。但對某些小圖可能出現壓縮完反而更大的情況。在調用的地方加層壓縮后和壓縮前大小的比較判斷,會完美解決這個問題。
當然也可以在工具類內部判斷,但個人覺得跟業務邏輯相關的代碼還是不要放在公用的工具類比較好。
總結
以上所述是小編給大家介紹的Vue 圖片壓縮并上傳至服務器功能,希望對大家有所幫助,如果大家有任何疑問請給我留言,小編會及時回復大家的。在此也非常感謝大家對億速云網站的支持!
如果你覺得本文對你有幫助,歡迎轉載,煩請注明出處,謝謝!
免責聲明:本站發布的內容(圖片、視頻和文字)以原創、轉載和分享為主,文章觀點不代表本網站立場,如果涉及侵權請聯系站長郵箱:is@yisu.com進行舉報,并提供相關證據,一經查實,將立刻刪除涉嫌侵權內容。