您好,登錄后才能下訂單哦!
您好,登錄后才能下訂單哦!
這篇文章主要介紹怎么使用HTML5+css3制作出12種的按鈕開關樣式,文中介紹的非常詳細,具有一定的參考價值,感興趣的小伙伴們一定要看完!
使用HTML5+css3制作按鈕開關的原理
根據設計的要求填充各種顏色。
按鈕開關的形狀需要具體問題具體分析,如圓形按鈕開關需要用到border-radius語句,方形可以直接使用div設置等。
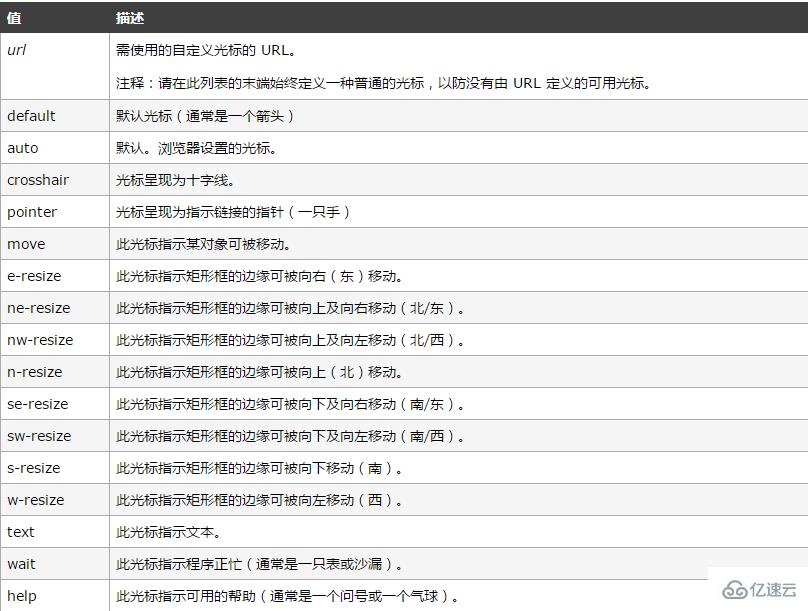
鼠標懸停的時候光標樣式的轉換也是注重設計感的體現,這里我們著重介紹一下cursor的用法:
cursor 屬性規定要顯示的光標的類型,該屬性定義了鼠標指針放在一個元素邊界范圍內時所用的光標形狀,根據W3C標準,現在市面上的幾乎所有瀏覽器都兼容cursor屬性,所以不要擔心與瀏覽器的兼容問題。
cursor屬性的用法如下表所示

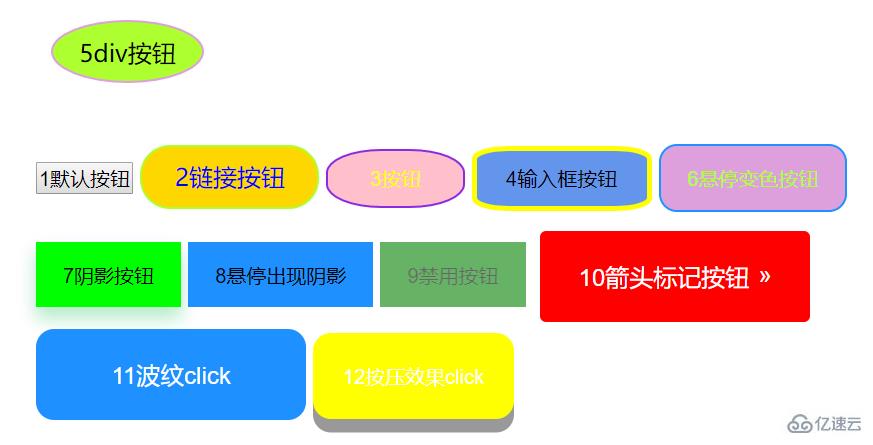
本文所示12種按鈕開關樣式分別為:div按鈕,默認按鈕,鏈接按鈕,圓角按鈕,輸入框按鈕,懸停變色按鈕,陰影按鈕,懸停出現按鈕,禁用按鈕,箭頭標記按鈕,波紋按鈕和按壓效果按鈕。
使用HTML5+css3制作按鈕開關的代碼
<!DOCTYPE html>
<html>
<head>
    <meta charset="UTF-8">
    <title>各式各樣的按鈕</title>
    <style type="text/css">
        *{
            margin: 0;
            padding: 0;
        }
        .wrap{
            width: 600px;
            height: 400px;
            margin: 0 auto;
            /*background: pink;*/
            padding: 30px 50px;
        }
        /*div按鈕*/
        .button5{
            width: 100px;
            height: 30px;
            float: left;
            /*position: absolute;*/
            text-align: center;
            padding-top: 10px;
            margin:0px 10px ;
            background: greenyellow;
            border: 1px solid plum;
            cursor: pointer;
            border-radius: 50%;
        }
        /*鏈接按鈕*/
        .button2{
            background: gold;
            border: 1px solid greenyellow;
            text-decoration: none;
            display: inline-block;
            padding: 10px 22px;
            border-radius: 20px;
            /*cursor: pointer;靠近按鈕的一只手*/
        }
        /*按鈕*/
        .button3{
            background: pink;
            border: 1px solid blueviolet;
            padding: 10px 28px;
            cursor: pointer;
            color: yellow;
            border-radius: 40%;
        }
        /*輸入框按鈕*/
        .button4{
            background: cornflowerblue;
            border: 3px solid yellow;
            padding: 10px 20px;
            border-radius: 20%;
            outline-style: none;/*去除點擊時外部框線*/
        }
        /*懸停變色按鈕*/
        .button6{
            background: plum;
            color: greenyellow;
            border: 1px solid dodgerblue;
            transition-duration: 1s;/*過渡時間*/
            border-radius: 12px;
            padding: 13px 18px;
            margin-top: 20px;
            outline-style: none;/*去除點擊時外部框線*/
        }
        .button6:hover{
            background: yellow;
            color: magenta;
            transition-duration: 1s;
        }
        /*陰影按鈕*/
        .button7{
            /*display: inline-block;*/
            border: none;
            background: lime;
            padding: 13px 18px;
            margin-top: 20px;
            /*outline-style: none;!*去除點擊時外部框線*!*/
            /*-webkit-transition-duration: 0.6s;*/
            transition-duration: 0.6s;
            /*設置按鈕陰影*/
            box-shadow: 0 8px 16px 0 rgba(0,255,0,0.2),0 6px 20px 0 rgba(0,0,255,0.1);
        }
        /*懸停出現陰影按鈕*/
        .button8{
            border: none;
            background: dodgerblue;
            padding: 13px 18px;
            margin-top: 20px;
            transition-duration: 0.6s;
        }
        .button8:hover{
            box-shadow: 0 12px 16px 0 rgba(0,255,0,0.24),0 17px 50px 0 rgba(0,0,255,0.19);
        }
        /*禁用按鈕*/
        .button9{
            border: none;
            background: green;
            padding: 13px 18px;
            margin-top: 20px;
            opacity: 0.6;/*設置按鈕的透明度*/
            cursor: not-allowed;/*設置按鈕為禁用狀態*/
        }
        /*箭頭標記按鈕*/
        .button10{
            display: inline-block;
            border: none;
            background: red;
            color: white;
            padding: 20px;
            text-align: center;
            border-radius: 4px;
            width: 180px;
            font-size: 16px;/*可以通過字體控制button大小*/
            transition: all 0.5s;
            margin: 5px;
            cursor: pointer;
        }
        .button10 span{
            cursor: pointer;
            display: inline-block;
            position: relative;
            transition: 0.5s;
        }
        .button10 span:after{
            content: '?';
            color: white;
            position: absolute;
            opacity: 0;/*先設置透明度為0,即不可見*/
            right:-20px;/*新增箭頭出來的方向*/
            transition: 0.5s;
        }
        .button10:hover span{
            padding-right: 15px;/*新增箭頭與前面文字的距離*/
        }
        .button10:hover span:after{
            opacity: 1;/*設置透明度為1,即可見狀態*/
            right: 0;
        }
        /*點擊出現波紋效果按鈕*/
        .button11{
            position: relative;/*必須添上這一句,否則波紋布滿整個頁面*/
            background: dodgerblue;
            border: none;
            color: white;
            width: 180px;
            font-size: 16px;/*可以通過字體控制button大小*/
            padding: 20px;
            border-radius: 12px;
            transition-duration: 0.4s;
            overflow: hidden;
            outline-style: none;/*去除點擊時外部框線*/
        }
        .button11:after{
            content:"";
            background: aquamarine;
            opacity: 0;
            display: block;
            position: absolute;
            padding-top: 300%;
            padding-left: 350%;
            margin-left: -20px!important;
            margin-top: -120%;
            transition: all 0.5s;
        }
        .button11:active:after{
            padding: 0;
            margin: 0;
            opacity: 1;
            transition: 0.1s;
        }
        /*點擊出現按壓效果*/
        .button12{
            outline-style: none;/*去除點擊時外部框線*/
            padding: 20px;
            color: white;
            background: yellow;
            border: none;
            border-radius: 12px;
            box-shadow: 0px 9px 0px rgba(144,144,144,1),0px 9px 25px rgba(0,0,0,.7);
        }
        .button12:hover{
            background: gold;
        }
        .button12:active{
            background: gold;
            box-shadow: 0 5px #666;
            transform: translateY(4px);
            transition-duration: 0s;/*過渡效果持續時間*/
        }
    </style>
</head>
<body>
<div>
    <div>5div按鈕</div>
    <p style="clear: both"><br></p>
    <button>1默認按鈕</button>
    <a href="#">2鏈接按鈕</a>
    <button>3按鈕</button>
    <input type="button" value="4輸入框按鈕">
    <button>6懸停變色按鈕</button>
    <button>7陰影按鈕</button>
    <button>8懸停出現陰影</button>
    <button>9禁用按鈕</button>
    <button style="vertical-align: middle"><span>10箭頭標記按鈕</span></button>
    <button>11波紋click</button>
    <button>12按壓效果click</button>
</div>
</body>
</html>
按鈕開關樣式如圖所示

以上是怎么使用HTML5+css3制作出12種的按鈕開關樣式的所有內容,感謝各位的閱讀!希望分享的內容對大家有幫助,更多相關知識,歡迎關注億速云行業資訊頻道!
免責聲明:本站發布的內容(圖片、視頻和文字)以原創、轉載和分享為主,文章觀點不代表本網站立場,如果涉及侵權請聯系站長郵箱:is@yisu.com進行舉報,并提供相關證據,一經查實,將立刻刪除涉嫌侵權內容。